Saturday, October 1, 2016

Deploying VDI for RDS 2012 / 2012 R2

Deploying VDI for RDS 2012 / 2012 R2 

Applies to: Windows Server 2012 and 2012 R2
In previous articles, we looked at the deployment steps of a traditional form of Remote Desktop Services (RDS) for 2012 and 2012 R2. Now let’s take a look at the setup of VDI for a 2012 RDS farm. This will be broken down into three parts. In this first part, we will go through the process of deploying the RD Virtualization Host role to a single Hyper-V server in an existing 2012 RDS farm. Then in the second part, we will go through the process of creating a desktop collection and publishing a Windows 7 pooled VDI desktop. Finally in part three, we will go through the process of maintaining a desktop image for a pooled desktop. This portion will cover the maintenance and updating of the main image in a pooled VDI desktop environment.

Part I

Before we begin, we will first need a physical 2012 server with the Hyper-V role installed. In a production environment, a Hyper-V cluster is preferred, however for this example, we will be using a single Hyper-V server for our deployment. This is a single physical domain joined 2012 R2 server running Hyper-V called Lab01. The server must be physical and not a virtual machine. We will add this new RD virtualization host (RDVH) server to our existing RD farm.
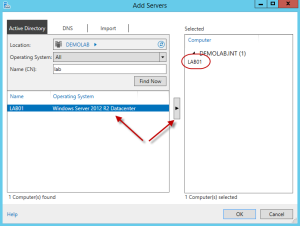
To begin, open Server Manager and add the designated RDVH server to be managed.
12
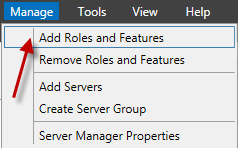
Once added, go to Manage and select Add Roles and Features.
3
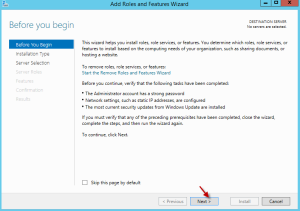
On the Before you Begin Screen, hit next.
4
On the select installation type screen, select Remote Desktop Services installation and hit next.
5
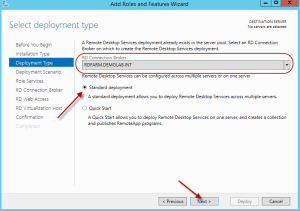
Since we are adding the Virtualization Host to an existing RDS farm which is already being managed with Server Manager in the server pool, it will automatically find the RD connection broker as it will be listed in the drop down. Select standard type and hit next.
6
For the deployment scenario, select virtual machine-based desktop deployment and hit next.
7
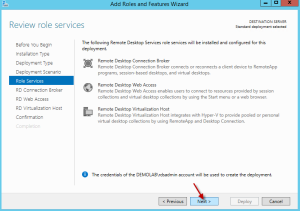
On the review role services page, hit next.
8
Since our farm is already configured, on the “Select RD Connection Broker server” and the “Select RD Web Access server” screens, the information is automatically added for you. Click next on both screens.
9 10
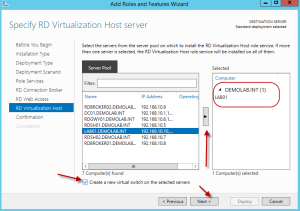
On the Specify RD Virtualization Host Server screen, let’s add our designated Hyper-V server. In this scenario, we are also going to allow the wizard to create a new virtual switch within Hyper-V to be used for our virtual desktops. This step is not required if a virtual switch was already configured on the Hyper-V server. To do so, check the box which says “Create a new virtual switch on the selected servers” and hit next.
11
On the confirmation screen, review the settings, then check the box “Restart the destination server automatically if required”. Hit Deploy.
12
Once it is finished, hit Close to close out of the wizard. If you now look in Hyper-V Manager, you will see a new virtual switch was created and will be used for the virtual desktops.
13
Now that we have our RD Virtualization Host server deployed, let’s go back into RDMS within Server Manager and edit the deployment properties of our farm.
14
Within the deployment properties, we now have two new sections. One is called Active Directory and the other Export Location.
15
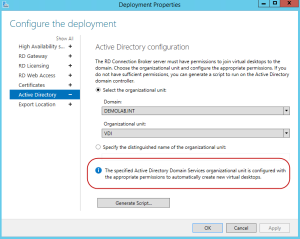
Within the Active Directory section, this is where we can specify the default Active Directory Organizational Unit which will house our VDI desktops. In order for this to work, the RD Connection Brokers will require full control on the security of the OU. Ive already pre-created an OU called VDI, and when I select it, it will give me an error stating the permissions are not correct.
16
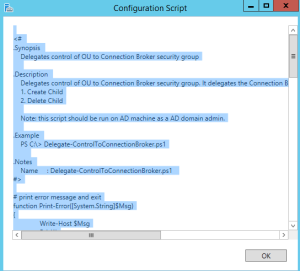
Depending on the level of security with the account you are logged in as, you can hit apply for the correct security permissions to be applied to the OU. In some cases, you may be using an account which does not have access to make this change. In these cases, you can click on Generate Script and it will generate a PowerShell script you can copy and send to an admin who has the correct administrative privileges who can run the script to apply to appropriate permissions.
17
When the correct permissions are made, you will see the following message stating it is configured with the appropriate permissions.
18
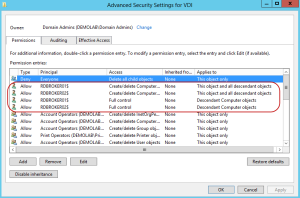
If we look at the security settings for the OU, you can see the correct permissions have been made. It will apply these permissions for each of the RD Connection Brokers in the farm since these will be the servers which will be facilitating the creation and deletion of the virtual desktops.
19
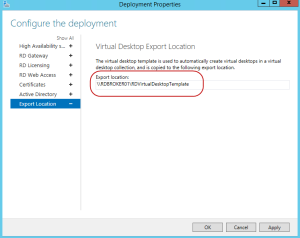
Finally, let’s look at the Export Location section. Here we can specify the folder where the virtual template, which is used to create the desktops, will be copied to. The default location will be shared on the active RD Connection Broker to a folder called RDVirtualDesktopTemplate. If you already have a folder designated for the virtual template, you can change it here and apply the changes.
20
Now with our RD Virtualization Host deployed, we are ready to move on and create a new collection to publish our VDI desktops.

Saturday, September 24, 2016

VMware Host Client 1.0 released with vSphere 6.0 Update 2

VMware Host Client 1.0 released with vSphere 6.0 Update 2

vSphere 6.0 continues to support the Windows-based vSphere Client (also known as C# Client, or the VI Client.) Customers now also have the option to use the HTML5-based VMware Host Client to perform host-based operations in its place.

What’s Available with VMware Host Client 1.0?

  • Support for  Virtual Machine hardware version 4 through 11
  • Support for VM lifecycle operations, such as deploying, configuring, and editing virtual machines of various complexity, including console access and snapshot management
  • Creating and managing network resources such as port groups, switches, NICs and firewalls.
  • Creating and managing storage resources such as datastores, adapters and devices
  • Managing host configurations such as running/stopping services and tuning of advanced host parameters to improve performance
  • Display of resource settings and graphs of cpu, memory, disk and network utilization
  • Display of events, tasks and logs of resource components to aid in troubleshooting
  • And most importantly, nothing to INSTALL – just point your browser (Chrome, IE, Firefox or Safari) to your host’s IP address and you’re up and running!

How to Access VMware Host Client?

You no need to install VMware Host Client separately, if you are running with ESXi 6.0 Update 2 because Host Client is shipped with ESXi 6.0 U2. Alternatively, if you are running the ESXi 6.0 without update 2, You will be able to download and install offline bundle of VMware Host Client 1.0 into the ESXi host and you can use the VMware Host Client.
VMware Host Client
My ESXi host is already upgraded to ESXi 6.0 Update 2 (Build 3620759). To manage the ESXi host using VMware Host Client, Simply type https:///Ui and Login with your ESXi root Credentials.
VMware Host Client
Once you are logged into host Client, You will be able to see the new rich and great look of VMware Host client similar to the view of vSphere Web client.
VMware Host Client
Below is Virtual Machine view of VMware Host Client.
VMware Host Client -ESXi 6.0 Update 2
Host Monitor View of VMware Host Client. This view allows you view the performance charts of ESXi host, Hardware Health status, Evets & tasks, Logs View and Notifications.
VMware Host Client -ESXi 6 Update 2
With VMware Host Client, You will be able to read the ESXi log files under Logs tab in monitor view. You no need to log in SSH session to read the ESXi logs. This is really a great effort!!
Vmware Host Client -read logs
Networking View of ESXi host in VMware Host Client will allow you  to View, create and configure Port Groups, Virtual Switches, VMkernel Nics, TCP/IP stacks and Firewall rules for ESXi.
VMware Host Client -ESXi 6.0 U2
Storage view of ESXi host in VMware host client allow you to view and add the datastores, Register a VM and allow you to browse the datastore and other options as same as vSphere client.
VMware Host Client -Storage view
Manage ESXi host view of Host Client. Manage Tab allows to configure various settings like Advanced settings, Hardware, Licensing Settings, Services , Security & Services , Swap configuration and Time & Date settings.
VMware Host Client -Manage
That’s it. We are done. I hope this post will help you get overview about VMware host client which is by default shipped in ESXi 6.0 Update 2. Let’s play around with Host client. Thanks for Reading!! Be social and share it in social media like Google+, facebook and twitter, if you feel worth sharing it.

How to Download and Install VMware Host Client utility on ESXi 5.5

How to Download and Install VMware Host Client utility on ESXi 5.5

Download and Install VMware Host Client

Download VMware Host Client

As similar to all softwares from VMware, you need to download and install VMware Host client vib file from the VMware website. This file needs to be installed on ESXi host. Download VMware Host Client.  Since VMware Host is shipped with vSphere 6.0 Update 2. Ensure you have selected 6.0U2 from select version drop-down.
Download and Install VMware Host Client
You can download VMware Host Client offline bundle ,if you want to install it via VMware Update manager.
Download and Install VMware Host Client_2
If you don’t have VMware Update Manager in your infrastructure and want to install Host client manually on the ESXi host, Download the VMware Host Client Standalone VIB and get it uploaded into ESXi host datastore.
Download and Install VMware Host Client

Installing VMware Host Client

once you have downloaded the VIB file for host client, upload the same into the ESXi datastore using datastore browse option or using WinSCP. Browse towards the VIB file location in ESXi. I have placed it in /tmp directory. Execute the below esxcli command to initiate the install VMware Host Client.
esxcli software vib install -v /tmp/VMware-Host-Client-1.0.0-3617585.vib
Download and Install VMware Host Client
To manage the ESXi host using VMware Host Client, Simply type https:///Ui and Login with your ESXi root Credentials. NOTE:  For ESXi 5.5U2 and prior, and ESXi 6.0 hosts upgraded from any 5.5U2 or prior version, you will get a 503 error returned after visiting https://ESXi_HostName_or_IP/ui/ . This is Known issue and documented inVMware Host Client instructions in VMware Fling.
Download and Install VMware Host Client

How to Resolve 503 Error in VMware Host Client:

To resolve 503 Error, please remove the line starting with /ui from/etc/vmware/rhttpproxy/endpoints.conf and restart rhttpproxy with/etc/init.d/rhttpproxy restart
Edit the config file “/etc/vmware/rhttpproxy/endpoints.conf” using VI Editor
Download and Install VMware Host Client
Remove the Line starting with /Ui
Download and Install VMware Host Client_7
Restart rhttpproxy with /etc/init.d/rhttpproxy restart
Download and Install VMware Host Client_8
For ESXi 5.5U2 and prior hosts, you must ensure to append a trailing / (forward slash) to the URL after /ui. The URL must be https:///ui/ and Login with your root Credentials.
Download and Install VMware Host Client
That’s it. We have done with the download and  install of VMware Host Client on ESXi 5.5 host. I hope this is informative for you. Thanks for Reading!!! Be social and share it in social media, if you feel share it in social media.

Tuesday, September 6, 2016

Windows Server KMS Client Setup Keys of Microsoft

Appendix A: KMS Client Setup Keys

 
Updated: August 3, 2016
Applies To: Windows 10, Windows 8.1, Windows Server 2012 R2
Computers that are running volume licensing editions of Windows 10, Windows 8.1, Windows Server 2012 R2, Windows 8, Windows Server 2012, Windows 7, Windows Server 2008 R2, Windows Vista, and Windows Server 2008 are, by default, KMS clients with no additional configuration needed.
To use the keys listed here (which are GVLKs), you must first have a KMS host running in your deployment. If you haven’t already configured a KMS host, see Deploy KMS Activation for steps to set one up.
If you are converting a computer from a KMS host, MAK, or retail edition of Windows to a KMS client, install the applicable setup key (GVLK) from the following tables. To install a client setup key, open an administrative command prompt on the client, type slmgr /ipk  and then press Enter.

If you want to…
…use these resources
Activate Windows outside of a volume-activation scenario (that is, you’re trying to activate a retail version of Windows), these keys will not work.
Use these links for retail versions of Windows:
Fix this error that you get when you try to activate a Windows 8.1, Windows Server 2012 R2 or newer system: “Error: 0xC004F050 The Software Licensing Service reported that the product key is invalid”…
Install this update on the KMS host if it is running Windows 8.1, Windows Server 2012 R2, Windows 8, or Windows Server 2012.
If you are running Windows Server 2008 R2 or Windows 7, be on the lookout for an update to support using those as KMS hosts for Windows 10 clients.

Windows Server 2016

Operating system edition
KMS Client Setup Key
Windows Server 2016 Datacenter
CB7KF-BWN84-R7R2Y-793K2-8XDDG
Windows Server 2016 Standard
WC2BQ-8NRM3-FDDYY-2BFGV-KHKQY
Windows Server 2016 Essentials
JCKRF-N37P4-C2D82-9YXRT-4M63B

Windows 10

Operating system edition
KMS Client Setup Key
Windows 10 Professional
W269N-WFGWX-YVC9B-4J6C9-T83GX
Windows 10 Professional N
MH37W-N47XK-V7XM9-C7227-GCQG9
Windows 10 Enterprise
NPPR9-FWDCX-D2C8J-H872K-2YT43
Windows 10 Enterprise N
DPH2V-TTNVB-4X9Q3-TJR4H-KHJW4
Windows 10 Education
NW6C2-QMPVW-D7KKK-3GKT6-VCFB2
Windows 10 Education N
2WH4N-8QGBV-H22JP-CT43Q-MDWWJ
Windows 10 Enterprise 2015 LTSB
WNMTR-4C88C-JK8YV-HQ7T2-76DF9
Windows 10 Enterprise 2015 LTSB N
2F77B-TNFGY-69QQF-B8YKP-D69TJ
Windows 10 Enterprise 2016 LTSB
DCPHK-NFMTC-H88MJ-PFHPY-QJ4BJ
Windows 10 Enterprise 2016 LTSB N
QFFDN-GRT3P-VKWWX-X7T3R-8B639

Windows Server 2012 R2 and Windows 8.1

Operating system edition
KMS Client Setup Key
Windows 8.1 Professional
GCRJD-8NW9H-F2CDX-CCM8D-9D6T9
Windows 8.1 Professional N
HMCNV-VVBFX-7HMBH-CTY9B-B4FXY
Windows 8.1 Enterprise
MHF9N-XY6XB-WVXMC-BTDCT-MKKG7
Windows 8.1 Enterprise N
TT4HM-HN7YT-62K67-RGRQJ-JFFXW
Windows Server 2012 R2 Server Standard
D2N9P-3P6X9-2R39C-7RTCD-MDVJX
Windows Server 2012 R2 Datacenter
W3GGN-FT8W3-Y4M27-J84CP-Q3VJ9
Windows Server 2012 R2 Essentials
KNC87-3J2TX-XB4WP-VCPJV-M4FWM

Windows Server 2012 and Windows 8

Operating system edition
KMS Client Setup Key
Windows 8 Professional
NG4HW-VH26C-733KW-K6F98-J8CK4
Windows 8 Professional N
XCVCF-2NXM9-723PB-MHCB7-2RYQQ
Windows 8 Enterprise
32JNW-9KQ84-P47T8-D8GGY-CWCK7
Windows 8 Enterprise N
JMNMF-RHW7P-DMY6X-RF3DR-X2BQT
Windows Server 2012
BN3D2-R7TKB-3YPBD-8DRP2-27GG4
Windows Server 2012 N
8N2M2-HWPGY-7PGT9-HGDD8-GVGGY
Windows Server 2012 Single Language
2WN2H-YGCQR-KFX6K-CD6TF-84YXQ
Windows Server 2012 Country Specific
4K36P-JN4VD-GDC6V-KDT89-DYFKP
Windows Server 2012 Server Standard
XC9B7-NBPP2-83J2H-RHMBY-92BT4
Windows Server 2012 MultiPoint Standard
HM7DN-YVMH3-46JC3-XYTG7-CYQJJ
Windows Server 2012 MultiPoint Premium
XNH6W-2V9GX-RGJ4K-Y8X6F-QGJ2G
Windows Server 2012 Datacenter
48HP8-DN98B-MYWDG-T2DCC-8W83P

Windows 7 and Windows Server 2008 R2

Operating system edition
KMS Client Setup Key
Windows 7 Professional
FJ82H-XT6CR-J8D7P-XQJJ2-GPDD4
Windows 7 Professional N
MRPKT-YTG23-K7D7T-X2JMM-QY7MG
Windows 7 Professional E
W82YF-2Q76Y-63HXB-FGJG9-GF7QX
Windows 7 Enterprise
33PXH-7Y6KF-2VJC9-XBBR8-HVTHH
Windows 7 Enterprise N
YDRBP-3D83W-TY26F-D46B2-XCKRJ
Windows 7 Enterprise E
C29WB-22CC8-VJ326-GHFJW-H9DH4
Windows Server 2008 R2 Web
6TPJF-RBVHG-WBW2R-86QPH-6RTM4
Windows Server 2008 R2 HPC edition
TT8MH-CG224-D3D7Q-498W2-9QCTX
Windows Server 2008 R2 Standard
YC6KT-GKW9T-YTKYR-T4X34-R7VHC
Windows Server 2008 R2 Enterprise
489J6-VHDMP-X63PK-3K798-CPX3Y
Windows Server 2008 R2 Datacenter
74YFP-3QFB3-KQT8W-PMXWJ-7M648
Windows Server 2008 R2 for Itanium-based Systems
GT63C-RJFQ3-4GMB6-BRFB9-CB83V

Windows Vista and Windows Server 2008

Operating system edition
KMS Client Setup Key
Windows Vista Business
YFKBB-PQJJV-G996G-VWGXY-2V3X8
Windows Vista Business N
HMBQG-8H2RH-C77VX-27R82-VMQBT
Windows Vista Enterprise
VKK3X-68KWM-X2YGT-QR4M6-4BWMV
Windows Vista Enterprise N
VTC42-BM838-43QHV-84HX6-XJXKV
Windows Web Server 2008
WYR28-R7TFJ-3X2YQ-YCY4H-M249D
Windows Server 2008 Standard
TM24T-X9RMF-VWXK6-X8JC9-BFGM2
Windows Server 2008 Standard without Hyper-V
W7VD6-7JFBR-RX26B-YKQ3Y-6FFFJ
Windows Server 2008 Enterprise
YQGMW-MPWTJ-34KDK-48M3W-X4Q6V
Windows Server 2008 Enterprise without Hyper-V
39BXF-X8Q23-P2WWT-38T2F-G3FPG
Windows Server 2008 HPC
RCTX3-KWVHP-BR6TB-RB6DM-6X7HP
Windows Server 2008 Datacenter
7M67G-PC374-GR742-YH8V4-TCBY3
Windows Server 2008 Datacenter without Hyper-V
22XQ2-VRXRG-P8D42-K34TD-G3QQC
Windows Server 2008 for Itanium-Based Systems
4DWFP-JF3DJ-B7DTH-78FJB-PDRHK